Showing posts with label garden. Show all posts

Crunchy Cucumber Salad with Cherry Tomato & Avocado

This salad is perfect if it's a hot summer day, or if you have excess cherry tomatoes, or if you want a quick salad that almost everyone likes, or all of the above! It's very good made with in-season tomatoes just off the vine and fresh cucumbers, particularly small pickling cukes. But it's also perfect any time of year made with regular grocery store ingredients.

In this version I used homegrown
yellow pear and orange Sungold tomatoes

We were introduced to this salad when visiting family friends over the summer. They gave us a delicious dinner that included this favorite, and when I got home I started making it again and again. It is so yummy! The basic premise is to combine the cool sweetness of small tomatoes with the fresh crunch of cucumber and tie it together with slick, creamy avocado chunks. It's all flavored with whatever is your fastest/favorite vinaigrette.


Ingredients:

1 pint sweet cherry tomatoes, any kind (best choice = orange Sungold)
3 small pickling cucumbers, or any cucumber (1-2 if it's larger size)
1 ripe avocado
1/4 cup vinaigrette (homemade or premade)
black pepper to taste

Assembly:

1. Smash or cut up your cucumber. If using fresh pickling cucumbers or similar small cukes, my suggestion is to smash them rather than just cutting them up. Smashing creates all kinds of jagged edges and surface area for the avocado and dressing to nestle and spread into. However, you can also cut up any cucumber for this. If using a larger type you may want to peel it.

I use the butt end of a chef's knife to smash,
then turn the knife and cut up any large pieces. 


These are not officially pickling cucumbers
but they are the right size and they smash nicely.

2. Cut your tomatoes in half. Peel and cut up the avocado into chunks. Combine all ingredients.

3. Pour on dressing and gently stir everything together. You can also add black pepper if you like. 

And now, serve! I like to put the big bowl on the table with small dishes and let people serve themselves. This salad is so easy and refreshing. I hope you try it!

Hugelkultur Gardening, Year 2

Hello! Happy summer! I'm here to report on our front-yard garden, which we set up in two rows last year for a hugelkultur experiment. I wasn't sure what we should do specifically to "refresh" our hugels now that they're in their second year. (They're really just very heaped-up garden beds rather than a full-on "hill," but keep in mind that underneath there are layers of wood and leaves that are supposed to decompose over several years.) So I simply made up a plan for jollying up the hugels a little bit this year, with the goal of getting things planted by around Memorial Day (the last weekend in May).

My main challenge was that we had covered everything with wood chips last year. I didn't really want to just mix those into the soil by hoeing or raking everything together. So I tried to push the wood chips aside a bit...

  • First I prepared by clearing weeds. I hoed and removed the tufts of grass and the dandelions that had set up shop.
  • Then I did my best to rake the wood chip layer away from the center of the hugel and toward the edges, to better expose the soil underneath.
  • Next I poured a bag of "Moo Dirt" augmented topsoil along the top of each hugel, and raked to mix it with the soil already there. 
  • Finally, I attempted to rake the wood chips back up so they covered things evenly again. 
I'm happy with how the soil got a fresh infusion of rich dirt, but my attempt to keep wood chips separate didn't really work. The wood chips are essentially mixed into the top layer of dirt now, but it seems fine!

Then it was planting time! Here's what's growing this year:


Cucumbers: I am in full battle mode with cucumber beetles as they have killed my cucumbers for several years in a row. I'm not being polite any more but just squishing them on sight. We have set up some trellis inventions for the cukes to climb should they survive that long.


Here's another angle of the cucumbers and trellising. I read that cucumber beetles don't like marigolds so I've planted those everywhere. Beyond the cucumbers are two summer squash plants, and at the far end of the hugel is a population of lettuce. I also put some kale plants here and there.


The other, streetside hugel has 3 tomatoes (foreground), and then chard and collards beyond that, and green beans at the far end. Everything seems happy over here!


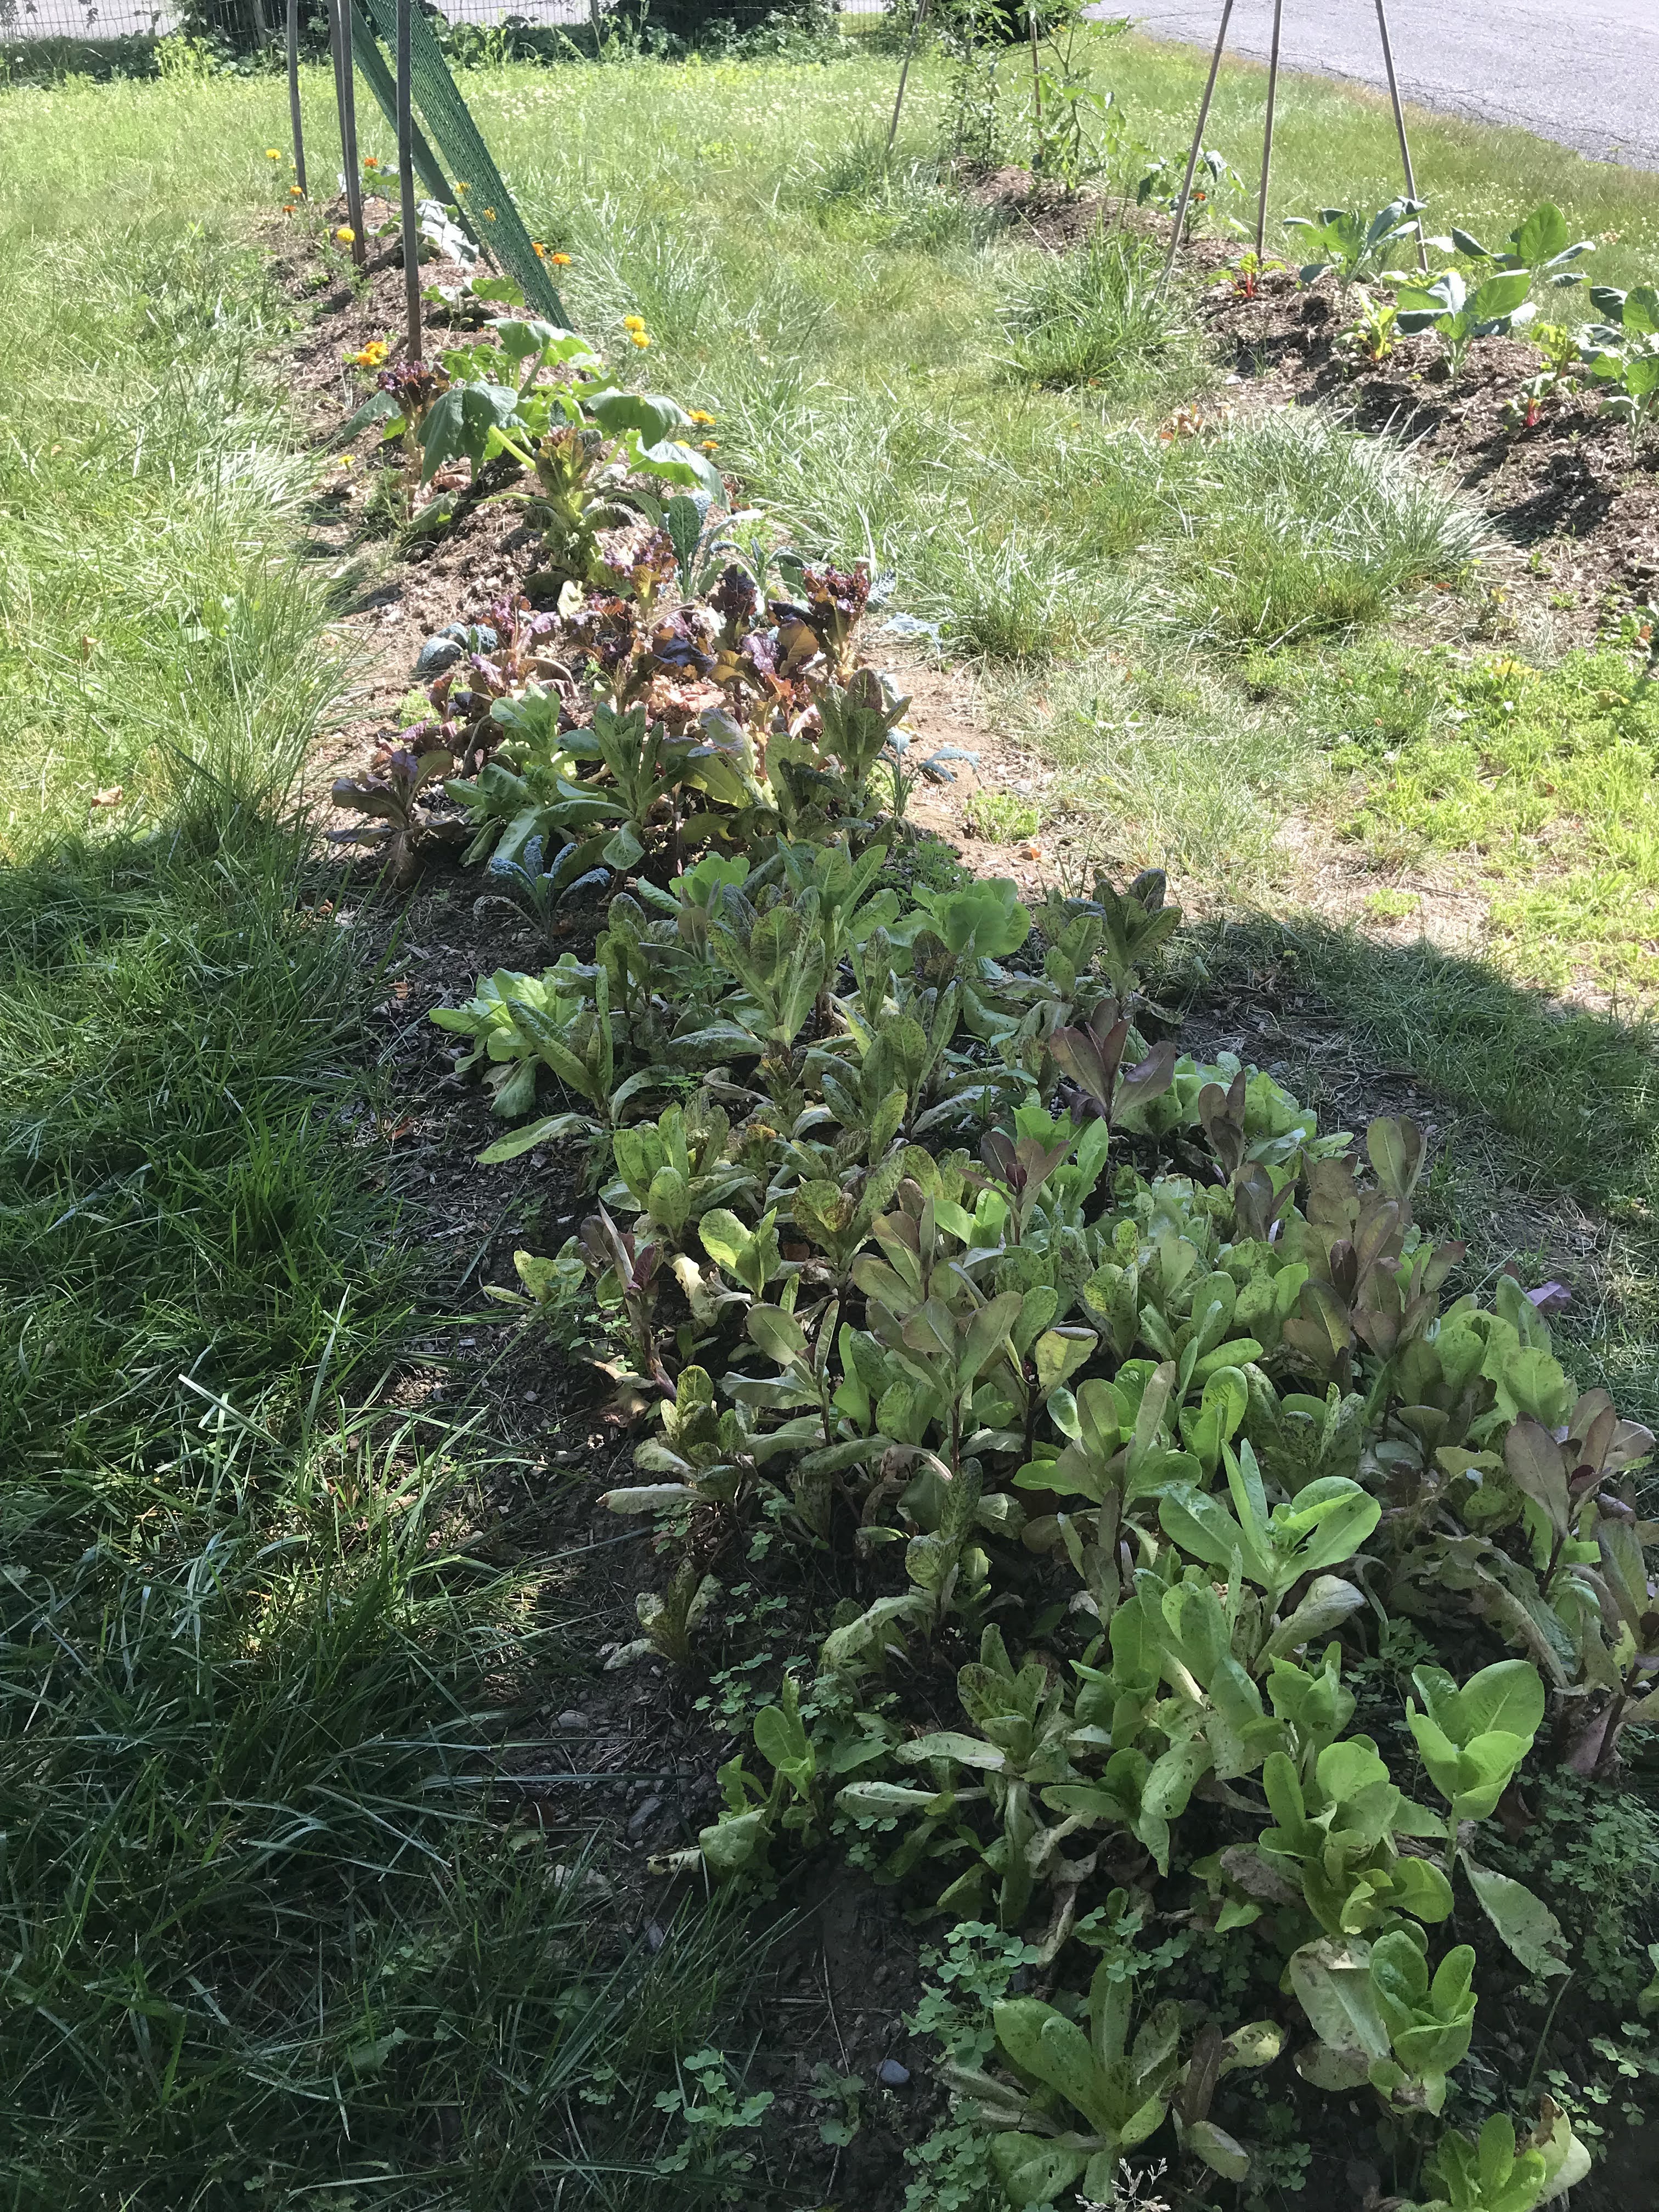
We pondered maybe getting more wood chips to re-cover everything, but at the moment I'm happy to just keep weeding and let nature take its course. On the plus side, several volunteer tomato plants have sprouted up from last year's plants. I also think that this sweet lettuce crop was probably all self-seeded because we let our lettuce go rampantly to seed last year. Check it out!

This lettuce in the foreground all just SHOWED UP as soon as frosty nights ended. It's been a delicious spring treat! We'll definitely let the lettuce go to seed again this year.


Homegrown Roma Tomato Sauce for Spaghetti

Say you're growing some Roma tomatoes. What are you supposed to DO with them? I know that Romas, also known as "paste tomatoes," are good for sauces because they aren't very juicy. They cook down well into concentrated flavor, allegedly. So I decided to try making from-scratch sauce from the Romas we've been growing in our hugels this year. This 5-ingredient recipe was inspired by Youtuber Joshua Weissman, who was in turn inspired by Marcella Hazan.

My first test used an onion and I found the sauce too sweet for my taste. So this recipe uses only garlic. Here's what I came up with!

Ingredients:

7-10 Roma tomatoes

extra virgin olive oil

3 cloves garlic

fresh herbs, such as basil, oregano, parsley (optional)

salt and pepper

1/2 pound of spaghetti

Romano cheese or favorite topping


Assembly:

1. First you'll be peeling the fresh tomatoes. Boil a pot of water and set up a bowl of ice water on the side. Cut a cross in the tip of each tomato, then throw in the boiling water for ONE MINUTE ONLY.


2. After one minute, scoop out the tomatoes with a slotted spoon and put in the ice water. 


Then remove each tomato from ice water and peel it. The peel should come off pretty easily. You can also cut out the tough stem area at this point. (Yes, some of my Romas have spots. That seems normal.)

3. Next dice the peeled tomatoes into small pieces.


Also, peel 3 cloves of garlic. Finally, if you have an herb garden or fresh herbs in your fridge, grab some fresh herbs of your choice. I used small sprigs of basil, oregano, and parsley, roughly chopped. 

4. Now it's time to cook! In your saucepan, heat up a generous amount of olive oil--around 2 Tablespoons. Throw in the chopped tomatoes and begin to cook them down. Mine released some moisture and I kept them covered to try to capture all the possible sauce. (Later though, I removed the lid to help concentrate the sauce.) It's a nice idea to squish the tomato pieces a bit with a wooden spoon as you cook. Put in one of the garlic cloves, either chopped or squeezed in a press. Also add the green herbs.

Cook for about 5-10 minutes. 

5. Meanwhile, heat a pot of water to boiling for cooking your spaghetti. I saved the water from the tomato-peeling process and added a bit more water to that and set it to heat up on a separate element.

Around when the pasta water is boiling, put some salt and pepper in your tomato sauce and squeeze in another clove of garlic. Cook your spaghetti according to package instructions (mine had a 10-minute cooking time).

6. Right around the time the spaghetti is done, squeeze the last clove of garlic into the sauce and turn it off. You should have a nice, chunky sauce. It is not naturally thick (it doesn't become tomato paste), but if you've taken the lid off at the right times, it shouldn't be too watery either.

7. To serve, just divide up your cooked spaghetti and spoon the sauce on top in the ratio you enjoy. I like to top with grated romano cheese too. In our home, this recipe served two adults, with a little bit of second helpings.


Happy Fall to you, I hope that you are enjoying some fruits of the season wherever you are!

Garden Update Summer 2021: The Burgeoning

Hello friend! This is an update on our hugelkultur project and how our garden is growing. 

This time of year feels like "the burgeoning" to me... all of the plants are at the top of their game. They're putting things in order and getting to the tippy-top of the rollercoaster ride. Then in August things will start to ripen and over-ripen and grow and over-grow and fall over and twist and generally explode. The roller coaster ride will start its fast, accelerating ride down toward autumn and next thing you know, there's snow on the ground. Jeez! But first let's celebrate the rest of summer.

The peaches are still green but starting to have a hint of color. (They might look peach-colored in the foreground, but they're really a greenish-yellow.)


The tomatoes are setting fruit at a tremendous pace and seem poised to ripen suddenly and all at once. We have already started getting a few ripe cherry tomatoes and pear tomatoes.


The onions are doing mysterious things underground and seem healthy. 


The yellow pear tomato is our biggest plant--it has grown to 6 feet tall (hitting the top of our bamboo structure). I finally started to "top" (cut off) the growing tips so that the plant would instead focus on ripening its fruit. Indeterminate tomatoes are remarkably aggressive at growing and branching and growing and branching. (Good job, tomatoes!)

In addition to the burgeoning, there are also plants that are already producing, and some have even passed their prime.

The summer squash has been very very busy.


Out of our three cucumber plants, only one has survived. I'm not sure if it's an infection from cucumber beetles, or just the incessant rain that we've had during July. But something killed two of our plants. We've since put in a replacement cucumber to see what will happen.


The green beans are near the top of this photo and they are producing delicious, crisp-tender beans that we harvest every few days. Just a modest handful or two at a time, which is a perfect amount. On the right side of this photo is kale that is also producing happily. On the left is lettuce, which heat and age have caused to go to seed. We let a few plants "bolt" to see what they would look like. That 3-foot tall tower on the left is red lettuce that has thoroughly gone to seed.

There are also a few plant-friends around the place that aren't exactly vegetables.

I planted marigolds alongside the tomato plants. They are very vigorous.


I also planted some speedwell in the perennial garden. It has purple spikes of flowers that pollinators love. Look closely and you can see there's a bumblebee hanging on the right side of the flowers. The bees just sit there and sip for minutes at a time.


Our CBD plant seems pretty happy. Or do you call it a hemp plant? A cannabis plant? I'm not sure what this plant is for (it's supposed to have no THC so it's not, like, drugs). Maybe we'll dry it at some point.

I hope that your summer has been going OK. Ours is good, though I am trying to firmly NOT overcommit myself or get TOO BUSY. Overbooking yourself is so pre-COVID, man. Here's to treating ourselves and each other more humanely whenever we possibly can, from now on.

Today is my fourth soberversary by the way! I have really been enjoying an alcohol-free life and would recommend it to anyone who feels like booze is playing too big a role in their coping. Read 20 reasons I like not drinking for details--they still hold true 3 years later.

Cheers to you (with seltzer and a side of delicious cheese and crackers)!

Groundations: Spring 2021

Hello dear reader! How are you doing these days? It seems like it's been one of the gentlest and most beautiful springs in recent memory to me, with flowers blooming extra long, the air perfumed with the scent of lilacs and apple blossoms and honeysuckle, and days of perfect weather that was not too hot or too cold. Now that it's June, the air smells like roses, particularly along the walking paths that border the West River here in Brattleboro, Vermont.

I want to tell you about a gardening project we have started NEW in 2021, and we'll see how it evolves for the rest of the growing season. I'm calling this post "Groundations" because it's a lovely word I heard ultrarunner Jorge Maravilla use in a podcast interview (it was the Morning Shakeout with Mario Fraioli). With all the nuttiness of the world, being able to work together on our garden and know that we'll have a little food coming our way from these efforts is very grounding and gives us foundations that feel good. It's all about the groundations.

So this year we are trying hugelkultur, which is essentially a type of permaculture-slash-raised bed that doesn't have a frame. I believe the word means "hill culture." Permaculture Magazine calls hugelkultur "no-dig raised beds with a difference," though we definitely did a lot of digging to set up our hugels. Today I'm sharing how we set up our two beds and how they're going so far!

First, we decided to let the original plot that I started back in 2017 go back to lawn for now. Instead we decided to dig two long beds--24 feet long it turns out--right across our front yard. We did this back in April when the ground had thawed but it wasn't yet blazing hot.


I am the "family forker" (I love using a digging fork) so I started things off by removing the turf in the area we wanted (turves are to the left in the photo above). Next we dug out more dirt to create two trenches below ground level.

The idea of hugelkultur is to put a lot of biodegradable material of different types into the structure of each bed. We had collected all of our maple leaves from last fall and wintered them in a bit of fencing. (Prof. Kitty trivia: the fencing we used was last year's cucumber trellis and tomato trellis wired together.) 


We also spent several weeks in March and April collecting sticks and branches and rotting logs, including getting a local work crew to drop off their yard trimmings one day instead of putting it in the chipper.


So after digging out the trenches, we built them back up with organic materials that will decompose over the next few years. First we put in the leaves.

Then we put in the newer sticks.


We topped that with older logs that had started to decompose already--the idea is that you're making an environment for both microbes and fungi to start their busy little communities.


We put more leaves on top of the wood, and then put the turves back on (trying to do this grass-side down). Finally we put the dirt on top while mixing in some bags of commercial compost.


In the photo above, the nearer left-hand hugel is done, and the right-hand one has the wood and leaves and is ready for turf and dirt. We were ready to plant! Except it was April in Vermont, so we needed to wait a few more weeks until the frost was done.

For the next part of the project, we got some wood chip mulch to cover the hugels and keep warmth and nutrients in and weeds down. In the above photo taken in May, the upper part of the frame shows a layer of the mulch on the hugel. We've never used mulch before, so this is a learning process--especially how to water a plant that buried in mulch as the water seems to just run down the side of our little hills. (We ended up clearing the mulch away from the plant stems, and we pour water into the little bowls that this created.)

Above are the hugels after we got the plants in at the end of May. We buy starts from local farm stands because we usually just want 1-5 of any particular thing. We planted beans, summer squash, a sugar baby watermelon, lettuce, spinach, parsley, onions, tomatoes, and cucumbers.

Below are the hugels today in June. (I don't know if "hugels" is the proper term, but we fondly call them our hugels.)

Three cucumbers plants are starting to take hold and flourish.


The tomatoes are growing nicely so far. Our next project will be to concoct a bamboo trellis for them--we're inspired by the setup that Jag Singh demonstrates in his Cheap & Easy Tomato Trellis video.


The lettuces on the near side of this hugel seem very happy. I'd like to plant some chard and kale on the other side.

That's the hugelkultur story so far! We're excited to reclaim more of our yard for food purposes! My understanding is that the soil will get richer after overwintering, which is a great time for microbial activity. I'll keep you posted on how the plants end up spreading out--we gave them a lot of space and I hope that it's enough!

How does your garden grow? Are you planting in new ways this year? Have you heard of hugelkultur before? How are your GROUNDATIONS?

Green Tomatoes: Gardening 2020

Back in the depths of winter, I decided to try some new things in the garden this summer. It's been a few years since the small beginner's garden that I started in 2017. I was ready to branch out! So I read some gardening books, watched some YouTube videos, and did some garden mapping. I came up with two goals for this year:
  1. Start cultivating fruit
  2. Experiment with trellising/fencing for cucumbers and for tomatoes
Here's how it's been going!

Adding fruit to our mini-homestead


This year I focused on 3 types of fruit--wild black raspberries, peaches, and elderberries.

The black raspberries (which I grew up calling just blackberries) are small and crunchy and juicy and taste of pure summer. My method with these was to corral the wild brambles we already had. In the spring, I selected 3 plants to keep, and tied their canes to 3 stakes. Two of the 3 plants did not like this at all. They had small, stubborn flowers, stunted leaves, and tiny, inedible, seedy berries. But the third plant was a success. It leafed out nicely, had normal blossoms, and set sweet juicy berries that ripened in early July.


Notes for next year: I'm planning to leave the same 3 plants and hope that the angry 2 can establish themselves better and be more fruitful. I will probably do a bit of pruning and tying in the spring and then leave everything alone. I did put some cheesecloth over the berries when almost ripe to protect them from birds--it worked OK though I think the cloth was a bit too thick (may have kept out some sun).

The peach tree that I planted on mother's day has a single, somewhat mangy-looking peach growing. I love it nonetheless because it is my first peach-baby.


Notes for next year: In the late fall or next spring I will prune the inward-facing branches to try to encourage the "vase" shape recommended for peach trees. This will be tricky because my tree has almost all its branches on just one side (it's a real left-leaning Vermonter). I'll also look into fertilizing it somehow. The library has a good fruits & berries book that I will refer to.

The final fruit that I added to our garden is the Elderberry. According to Nourse Farms, the nursery where I purchased the plants (which I received by mail in the midst of the pandemic lockdown), you need two types of Elderberry plants so that they can cross-pollinate properly. So I got one Samdal and one Samyl variety. This first year they are just focusing on growing, but maybe next year we'll have some flowers and berries. Then I plan to tincture the berries to create anti-viral folk medicine.

The plants are about knee-high right now (which is great progress from the small 6-inch sticks that I planted back in May).


Notes for next year: Some 4-stripe beetles set up shop in June and wrecked a bunch of young leaves. I used some organic insecticide soap to discourage them, and things seem better now. Next year I'll keep an eye out for them. And I'll look into whether I should prune or possibly tie back the plants, since I need them to stay in a certain amount of space.

The trellis experiment: new techniques with tomatoes & cucumbers


YouTubers make everything look so easy. I watched a bunch of videos about creating arched trellises and fence-like trellises for tomatoes and cucumbers, and it looked simple enough. I decided to do a tall fence-style trellis for the tomatoes. (It's like a fence, except the bottom of the fencing starts 18 inches off the ground.) And an arch-style trellis for cucumbers, so they could climb up and around and the cukes would hang off for easy picking.


There are 4 tomatoes plants along this trellis, and they seem very happy. Two of them are already taller than the fence (and taller than me). I use a green, plastic-y tying tape that I found at Agway to gently attach the plants to the fence. We have 3 varieties of tomatoes that are slowly ripening: yellow pear, a larger slicer that will also be yellow, and 2 plants of the candy-like orange Sungolds.


Yummmmmm.

Notes for next year: Not sure yet. I like this method so far, but we'll have to see what happens in the "heavy" months as these indeterminate plants keep growing and growing. (I learned from Youtube that indeterminate tomatoes, which are the type I have, will keep vining and growing unless they are vigorously pruned and "de-suckered." I'm trying to keep up with them!) In the past I have found that September is the time when tomatoes get so excited and branchy that they start to pull down whatever I've used to stake or tie them to. We'll see if this fencing holds up. I may need to move to industrial cattle panel.

The cucumbers are less excited about my trellising. They do not put ANY of their tendrils around the metal. Maybe it gets too hot for them? I have ended up tying the plants to the fencing, but they seem a bit sulky about it.


The arch is a little hard to see in the above photo, but there are 2 plants in the foreground that are planted on one side of the arch, and 2 plants across from them that are supposed to climb up the other side. They do not want to.


Still, they're doing their best.

Notes for next year: I like the idea of trellising, but I need something the cukes will want to climb themselves. More winter research is in order. Or leave me a comment!

The rest of the garden


Apart from my 2 goals, I planted some other things. Like 4 squash plants which is QUITE ENOUGH. I gave them extra space this year, putting two in the regular garden, one in the herb garden, and one in the flower garden. They seem pretty happy so far.


I planted greens fairly early (mid-May) and they've taken a long time to mature, but they're now ready. I have 2 rows of kale and one of chard. An early two rows of radishes have already been harvested, and now I'm trying some beans as a second crop in that spot.


The garden is a nice refuge at the end of a day. I water everything every day that it doesn't rain. I give the peach tree 4 gallons of water 3 times a week to help it establish its roots in Year 1. I spend some time pulling up grass and examining the tomatoes. It's exciting to have a meal with our own squash, our own cucumbers, and our own chard. I'm looking forward to a bounty of tomatoes very, very soon.

What are you growing?