Raspberry Liqueur: Nectar of the Gods

My beloved gives the nicest spontaneous gifts. A CD I happened to mention and then forgot, local flowers, little pastries, he's thoughtful and generous... and likes to make them a surprise! He is especially good at digging up strange and interesting books for me. A few years ago he gave me a copy of Homemade Liqueurs, by Dona & Mel Meilach (Contemporary Books, 1979). It tells you how to make liqueur from just about anything--peanuts, black tea, caraway seeds, you name it. (It also has a second section about how to cook with liqueurs.) I find homemade fruit liqueur to be a fabulous holiday gift. It's also a sweet way to sit back and remember summer sunshine during the long dark evenings of @#$%-ing February. This raspberry liqueur is my favorite so far from the book, because it tastes so exactly like fresh raspberries--times 100 and plus booze. Here are the basic ingredients:
  • 2.5 cups of fresh raspberries (lightly rinsed)
  • 5 cups vodka (any kind)
  • 1 organic lemon (look for a nice firm skin)
You'll also need one 1/2 gallon canning jar, some kind of grater or zester and a long-handled spoon.

ingredients

Part 1. The first step will take about 20 minutes plus 1 month. You just need to get the berries soaking. Zest the lemon and add it to your jar.

zest

Add the berries and lightly "bruise" them with your long-handled spoon. You do NOT need to mush them to a pulp. It's OK if some are still intact. Just press them around for a bit to "open them up" for the vodka.

mash

Then, add the vodka.

vodka

You're done. Put the lid on tight and turn the whole thing upside down a few times to mix. Then put it in a dark place for 1 month. (It's OK if you leave it for longer, too.) The trick is, you have to remember to shake it at least every week or so. By "shake" I don't mean agitate like you're making a martini. Just gently turn it over and swirl it a bit so everything moves around. Tip: If you don't have a dark place, just wrap your jar in a few layers of newspaper to keep the light out. Another tip: Put a stickie note on top with the date you started. I also recommend jotting down how many cups of raspberries & vodka you used.

On the left here is my raspberry-liqueur-in-the-making, ready for the dark place (aka closet). It will sit there next to the blueberry liqueur (right) I started a few weeks before. (4 cups blueberries, zest of 1 lemon, 3 cups vodka.) Here endeth part 1.

liqueurs

Part 2: This step takes about 30 minutes plus 4-6 weeks. I don't have photos yet but will just outline it here:
  • Make 1 cup of simple syrup by heating 1 cup of white sugar with 1/2 cup water.
  • Strain your fruit-vodka mixture through cheese-cloth. An easy way to do this is to set some cheese cloth over a bowl and pour everything in. Then pick up the corners of the cheesecloth and SQUEEZE to get out as much of the juicy red booze as you can. (You can save the left-over fruit in the refrigerator indefinitely--just put it in another canning jar and cover with brandy. Good for serving over ice-cream or eating by the spoonful late at night.)
  • Return the strained fruit-vodka to the canning jar and add the simple syrup. (If you can give it some time to cool, that's great.) Swirl to mix.
  • Return it to the dark place for 4-6 weeks to "mature."
  • Sip and savor. One winter I gave bottles of this as gifts. I just funneled the liqueur into mini wine bottles (from the brew supply store) and topped with craft corks. Customize cool labels if you want!

Gilfeather Turnip Soup with Sea-legs revisited

I'm proud to say that if you type "Gilfeather" "turnip" and "soup" into a search engine, my 2004 recipe "Gilfeather turnip soup with sea-legs" comes up pretty high. The "sea-legs" refers to crab--I liked the double play on crab appendages and on getting accustomed to your surroundings. Still like it. Anyway, it's Gilfeather turnip season at the farmer's market again. The Gilfeather is a huge turnip native to New England. Clothespin for scale in this photo.

gilfeatherscale

My soup recipe being the only use for Gilfeather turnips that I know, I decided to make another batch. It's been awhile! I'm not going to re-key the whole recipe--the 2004 one still works great. But I do want to present some photo highlights. And I want to confirm that this soup is really good! Try it if you come across any Gilfeather turnips!

Here's the single turnip, cut into large chunks:

turnipchunks

I didn't have any potatoes this time, so made do with just carrots and turnip. Add chicken broth and bay leaf, ready to boil.

beforeboil

As recommended, once the veggies had softened I stashed the soup in the fridge until the next day. Then I mashed everything up and reheated.

mashed

Last step is to add the crab and heat through--maybe 10 more minutes. My dining companion found an excellent crab from Vietnam in a refrigerated foil pouch. (The first time I just used canned crab.) The chunks were large and juicy and perfect for the rough texture of this soup. I suppose you could puree everything either before or after adding the crab, but I like the folky charm of this THICK potage.

finished soup

Harvest crudités: Veggies in whisky glasses


OK, so I really like Scotch. One of my fave blends had a campaign where you get a free whisky glass with each bottle you buy. Now I have 4 glasses--how did that happen!? I like to use them for things other than whisky, like this easy appetizer setup with farmer's market vegetables and a simple dip-mix dip. (It was ORGANIC dip mix though!! I don't know why I feel guilty about something that takes less than a minute to make.) As you can see, I just used carrots, radish and celery with a chive garnish. It was fresh and crunchy and delicious. The best part, passing toddlers get a chance to eat vegetables as if they were perfectly normal food!

Wipies: Easy DIY Baby Gift

I invented these for myself a couple years ago. They're indispensable for all kinds of child-related spills, messes, spit-ups, drools, runny noses, etc. I just made another batch for an expecting friend, and highly recommend them as a nice personalized baby gift! In our house we call them "wipies." They're basically small pieces of flannel that serve as baby hankies for any and all wiping needs. Turns out that babies can go through a LOT of hankies, so it's great (and green) to have something that's washable and reusable. Here's how to make wipies!

The secret is to buy "Fat Quarters." These are a specific cut of fabric from the end of a fabric roll. Quilters love them because they allow you to buy a small piece of fabric for some specific need. And the store wants to get rid of them, so they are not expensive. For this project, get 4 flannel fat quarters (get creative with colors & designs!). Flannel is preferable as it's both soft and fairly absorbent. From 4 fat quarters you'll get a set of 2 dozen wipies, like this:

finishedstack

Step 1: Cut each fat quarter into 6 pieces. If your fat quarter has a selvedge that looks different, cut it off. Here's a fat quarter spread out before cutting. It had a wide white selvedge that I removed.

fatquarter

To cut, first fold it in half the long way.

foldedinhalf

Then, slip your shears in the long fold you created and cut. If you unfolded it, it would look like this (but don't unfold it!).

halfquarter

Instead of unfolding, keep the two halves together and fold them again into thirds. Cut along the two new folds. You'll now have three pairs, like this.

finalsix

Step 2: Zig-zag stitch around the edges. This simply finishes the edge so it won't fray beyond a certain point. (A little bit of preliminary fraying is to be expected.) Set your machine to sew in zig-zags--on mine, this is the same as the regular stitch except the stitch width is adjusted so it's more than 0. This just means the needle moves back and forth now as well as forward. I suggest using some scraps to get your zig-zags the way you want before you start on the wipies. You're looking for about the same width as the stitch is long, like this (upper left):

stitchsize

I prefer making the corners as demonstrated above, stopping with the needle on the LEFT side of taking a stitch. Then, with the needle in the downward position, lift the foot and swivel the fabric. Drop the foot and start sewing again. Here's the needle on the left, before swiveling:

endleft

Then I lift the foot (keeping the needle down), swivel the fabric 90 degrees, and drop the foot again so it looks like this. I haven't moved the needle.

afterswivel

The reason I prefer to keep the needle on the left is because the resulting corner will look like this, with a nice star-shape:

endleft2

You could leave the needle to the right if you want, and end up with a pointy-looking corner like this. Maybe you prefer it?

endright

One fun thing about this project is that you can get creative with the thread colors. Try interesting contrasts. At the same time, this is the perfect way to use up bobbins and spools that don't have much thread left on them. Here's my work area, with folded finished wipies at the top, cut squares ready to sew laid out, and short bobbins and spools set out to consider.

cutpieces

Here's a single wipie finished all the way around. In case you were wondering, do treat selvedges just like any other side (unless you cut them off as described above).

finishedwipie

I like to fold wipies into quarters. Then, you can stack them up and tie with a ribbon. Or look for a nice container to keep them in—see last photo below.

tidyfolded

For nursing infants, wipies are great to just scatter around the house anywhere you're likely to sit down with the baby. Keep one stuffed in your pocket, one in the changing bag. A stack on the changing table. Throw used wipies in the wash, and you're ready to start again. (I suggest not pre-washing your gift, as some moms are particular about the kind of detergent they want near their baby.)

Here's a shot of my own set of wipies after 2 years of use and love—plus the plastic container I stash them in.

lovedwipies

J'aime Vampire Weekend

I guess Vampire Weekend were on the cover of SPIN this past spring. Band to watch and all that. I missed it. I only discovered them in June it appears, but I love them lots. They are my autumn soundtrack, especially "M79." Their music sounds like someone in your dorm was listening to a lot of 80's era Paul Simon and Thomas Mapfumo and studying the balalaika and dating someone who wears a LOT of eyeliner and then put all those things together into delectable perfect pop music. "M79" is getting nominated as my favorite track of 2008. (Favorite from 2007? It was "2080" by Yeasayer. Visit their Myspace pages linked below to hear both!) I highly recommend getting not only their current CD but seeking out "Ottoman" from the Nick & Norah's Infinite Playlist soundtrack as well as their adorable cover of Fleetwood Mac's "Everywhere." Yum! "M79" is especially delicious because it sounds ever so slightly like Sting is singing it.

Beef Jerky Time continues it reign over Weds. nite airwaves from 7-8pm on WVEW-LP. Here are some playlists, first from 10*8*08:
  • Naked As We Came: Iron & Wine
  • Crown of Love: Arcade Fire
  • Adrenaline: Emma Pollock
  • Matinee Idol: Aden
  • Love Vibration: Josh Rouse
  • Boyz: M.I.A.
  • Little Bit: Lykke Li
  • M79: Vampire Weekend
  • The Way We Get By: Spoon
  • 2080: Yeasayer
  • Rusty D-con-STRUCK-tion: Ashley MacIsaac
  • Time to Build: Beastie Boys
  • The Friend I Once Had: Club 8
  • Axcerpt: Mekons

The next week I played garage-type sounds, mostly. 10*15*08
  • Time Bomb: Rancid
  • Piste 01: Hifiklub
  • Comin' Around: Juliette & the Licks
  • Don't Cry Wolf: Willie Loco Alexander
  • Duality: The Martial Arts
  • I'd Be So Pleased: The Hi Fives
  • Second, Minute or Hour: Jack Penate
  • Devil Town: Groovie Ghoulies
  • 40 Boys in 40 Nights: The Donnas
  • Habit: Citizen Fish
  • Down: Rockin' Roadrunners
  • I'm in Love with What's-Her-Name: Dr. Frank
  • Life from a Window: The Jam
  • Minority: Green Day
  • My Jeanette: Squirtgun
  • House of Fun: Madness
  • Not the One for Me: Thee Wylde Maniacs
  • London Calling: The Clash
  • Maneater: Cathode

Ode to Dim Sum

One of my many little obsessions is dim sum. When I'm trying to explain it, I say that it's like the Chinese version of Spanish tapas or Greek meze, though of course each is totally different with its own cultural significance and traditions. Basically, it's a lunch-hour meal composed of many small dishes, usually served in metal or bamboo steamers, that can take hours to eat and is totally delicious and satisfying. I'm writing about it today because I'm pleased to say that I've found a restaurant that serves dim sum within an hour's drive of my house. That's half as far as I thought I had to go, so I'm VERY excited. (Generally dim sum is only served in very big cities, which can easily handle the demand. They tend to have good tapas and meze, too...)

Cooking dim sum is one of my favourite hobbies, although it takes me a year or two to work myself up for another bout. It takes at least 8 hours for me to cook a dim sum meal, so I really need to be prepared and carve out a day for doing it. Usually December 26 is an excellent date for such a project. The book I have is by Ellen Leong Blonder, called Dim Sum: The Art of the Chinese Tea Lunch (Clarkson Potter 2002). I like it because the author describes different types of tea and how to brew it, supplies needed and where to find them, and gives a variety of sauce and dough recipes besides the main info about dim sum. She also includes cute instructional drawings of how to set up steamers and how to pleat dough, etc.

Here's a list of the recipes I've attempted so far, with a few notes:
  • pork & shrimp siu mai--one of the easier ones, and really tasty
  • boiled beef dumplings
  • potstickers--really really yummy, also fairly easy
  • steamed char siu bao--these are the fluffy white buns with roasted pork inside. They are insanely complicated (for me) and time consuming, but surprisingly authentic once attempted
  • rice in lotus leaf packets--I love this, but other family members find the lotus leaf taste/scent overwhelming
  • greens with oyster sauce & oil--not everything is a dumpling!
  • stuffed bell peppers
  • steamed sweet bao--with adzuki bean filling
  • sweet red bean-filled pancakes--another use for adzuki bean filling
I'm really only scratching the surface of the recipes in this book. I haven't made anything with rice flour, and I haven't deep-fried anything. Also, I'm sure there are other great books out there to discover! Please add a comment if you have a favourite book.

So how does a small-town Northeasterner like me get such a taste for dim sum? I have my parents to thank. We used to go to Toronto a lot when I was a kid, and they often took me to a great place on Dundas St, near Eaton's Center, called the Pink Pearl. It had the carts and everything (and a small flight of stairs between the kitchen level and the street-level dining room, so 2 people would have to man-handle the cart up and down the stairs every trip). We'd mass up piles of dishes on our table, then go pay the cashier at the front who mysteriously knew just how much to charge. It took several visits before I figured out how our bill was totaled--they counted the number and sizes of the plates and steamers left on our table. (The Pink Pearl still exists--it has since moved uptown to Avenue Road.) Then came my college years, spent in the same multicultural city of Toronto. I found that dim sum restaurants come in 2 stripes--there are the big ones with the carts that really count on dim sum as a big part of their day-time business. These probably have the best selection and the freshest and most well-made dishes. (Most don't count plates. Instead you get a stamp for each type of dim sum you choose, and the stamps are added up at the end.) There are also the small Chinese restaurants who just don't have enough seating to maintain a constant parade of carts. Instead, they give each table a list of available dim sum and you check off what you want. Then, they bring dishes out to you as they're ready. Of the big kind of restaurant, I liked the New Pacific on Dundas. I think it's closed now. And there's the Bright Pearl on Spadina that I only discovered a couple years ago. It is fabulous. Of the small kind, I liked a little place on Baldwin St. and another little one in Kensington Market. When I lived in Boston we also frequented the gigantic Chau Chow City--it has the same "industrial dim sum" atmosphere that I love. Busy restaurant, plastic tablecloths, big line out front, multiple floors, and carts and carts of amazing selections passing by. Bean curd wraps, fried taro rolls, stuffed eggplant, rice flour rolls and any kind of spring rolls are among my other faves. My absolute favorite dim sum in the whole world is shrimp ha gow. I am not sure I could ever have enough of these.

OK, moving on to the breaking news, I found a restaurant in Florence, Massachusetts, that serves dim sum every Saturday afternoon from 11-3. It's called the 
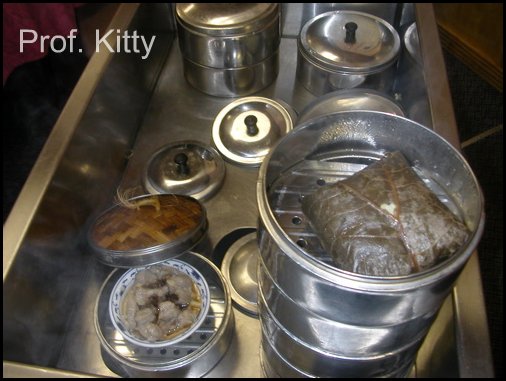
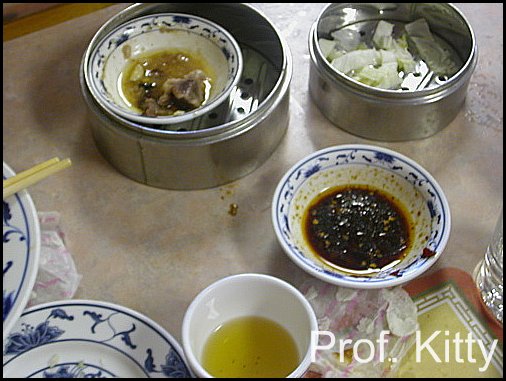
Great Wall and I think it's best described as "sweet." They have 1 dim sum cart. Here's a photo after about 6 tables had their way with it--lotus leaf packet in bottom right corner, spare ribs in bottom left.

dimsumcart

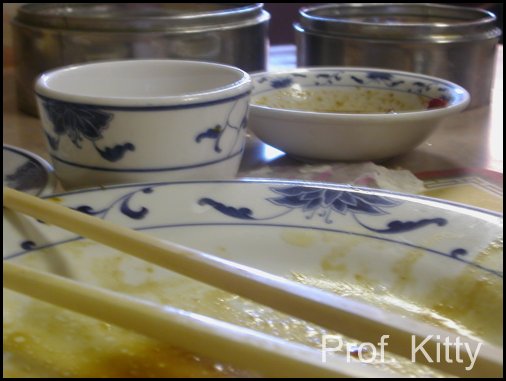
Also on the cart were 2 kinds of siu mai (pork, chicken & shrimp), 2 kinds of bao (chicken & char siu) and shrimp ha gow (hooray!). There was also a table in the middle of the room that had other offerings, but the waiters (there were 2 and both seemed under 15) said we had to ask them to get items from there, but we didn't know what to ask for so didn't get anything. On the way out I took a peek and saw there were potstickers, sesame balls, tofu in sauce, scallion pancakes (I think), lo mein, and salt & pepper whole shrimp. I have no problem with missing that stuff because it just means we'll have to go back for more. We cleaned up our choices from the cart pretty fast. The chili sauce, in the middle right of this pic, was really really good.

dimsum1

I will definitely be going back to the Great Wall because they have something I madly crave. Will probably be dragging other family and friends there too on dim sum pilgrimages. This discovery has pretty much made my month. I wouldn't say their dim sum is the best I've ever had. But it's got something on all the other dim sum in the world: proximity. A parting shot from a satisfied customer:

dimsum2

Cider Pressing in New England

Here are some photos of a New England afternoon that we spent with a bunch of apples and a cider press. I've found that every cider press is different. But the process always involves the same basic steps--grind up the apples, then squeeeeeeze.

First, we sorted the apples. Discard any that are rotten, buggy, squishy or otherwise icky. These apples came from my mother's tree and we think they're MacIntosh. We put them in a milk crate and hosed them off to remove dirt and large bugs. (Small bugs just get mixed in... protein, right?!)

Sorting apples

Next, the apples go into what I'll call the "hopper."

hopperpestle

For this unit, we had a big wooden pusher or pestle to help move the apples toward the wheel. One person pokes the apples with the pestle, and the other cranks.

hopper

The wheel inside the hopper has teeth and tears up the apples as it is hand-cranked from the outside. (See top-right for cranking action.)

pestlecrank

The bits of apple fall into the orange cooler set underneath.

crankcooler

The next step is to SQUEEZE the torn-up apples to extract the cider. The pieces are poured into a barrel-type thing. They're held in a cloth bag that is then folded in. 2 wooden pieces are fitted on top to form the main pressing surface.

pressprep

Then, more pieces of wood are stacked on so that the jack will be high enough.

pressprep2

Finally, the jack is screwed on top and the next round of cranking can begin.

pressprep3

The handle is spun around.

pressing

And cider comes out the bottom!

the juice

Here's a shot of the whole press, including the cool dairy container we caught the cider in.

wholepress

I didn't get a photo of this, but there was one more step where we filtered the cider through a tea-towel/colander into a large metal bowl. Then, it was ready to drink!

Cider: ready to drink

Big thanks to P&M for having us over for a fabulous Saturday afternoon of cidermaking, followed by an amazing Indian dinner. We got 2 gallons of cider to take home, and it's delicious. (Especially with a little 10-Cane rum poured in. My favourite...)

Also thanks to Wandering Chopsticks for advice on how to frame and watermark my photos! This is my first post using Flickr and I hope it looks good...

Brew queen

I now consider my New Year's resolution to make homebrew fulfilled. I have almost 2 cases of what I'm calling "New England Pilsale" carbonating in the basement. Last night I bottled my first batch of 2008 homebrew--came to exactly 46 bottles. It's called "Pilsale" because its a Pils recipe but they gave me an ale yeast because I'm not pro enough to ferment at the right (cold) temperature. In the glass 5-gallon carboy the Pilsale looked honey-caramel colored, but as I siphoned it into bottles, the beer in the thin tube looked very light. I think it will be good. It's highly recommended to leave it alone for at least a month before sampling. I have November 6 marked on my calendar as the first date to give it a try.

The specific gravity to start was 1.038 and to finish was 1.007. I figured there must be some online calculator that would let me type these in and figure out my percent alcohol. Behold, my first hit was Lee's Brewery Beer Math Calculator (http://leebrewery.com/beermath.htm). According to this my beer will be around 4% alcohol, which is right on target. Next up I'm going to try Charlie Papazian's Crystal Honey Lager. I know, I still don't know how to ferment under refrigeration, but I'm going to try it anyway. If the beer store staff will let me, that is. I figure all I need is some simple dried malt extract and Cascade hops. Also I'm planning to brew in the afternoon this time instead of evening, because it takes forever to get the wort temperature down low enough. I hate waiting til midnight just for a big bucket of proto-beer to cool off...

Here are 2 Beef Jerky Time playlists for your delectation. First is from 9*24*08, my mellow "Welcome Autumn" show:
  • Quiet Nights of Quiet Stars (Corcovado): Doris Day
  • Sweet Mother Earth: Bert Jansch
  • St. Elmo's Fire (radio): Uilab
  • Cakes & Ale: Silly Sisters
  • Rickover's Dream: Michael Hedges
  • Leaves that Are Green: Simon & Garfunkel
  • Everything About It Is a Love Song: Paul Simon
  • Chimes of Freedom: The Byrds
  • A Taste of Honey: Martin Denny
  • John Barleycorn: Traffic
  • Polio: The Sea & Cake
  • 2 Sisters: Shakti
  • Fisherman's Dream: Emerald
  • Arms (Aaron Spectre mix): Aarktica

Next, the 10*1*08 show featured a lot of new stuff--exciting!
  • Sabali: Amadou & Mariam
  • Suivez la Piste: Saloon
  • Another Day: Milosh
  • Good Time: Brazilian Girls
  • Blueberry Pie: The Upallnights
  • Wraith Pinned to the Mist & Other Games: Of Montreal
  • Ottoman: Vampire Weekend
  • Can't Say No: Helio Sequence
  • Something Is Not Right With Me: Cold War Kids
  • Hey Hey Hey (That Kid's OK): Ruby Isle
  • Turbulent Head: Southern Arts Society
  • White Winter Hymnal: Fleet Foxes
  • Everywhere (Fleetwood Mac Cover): Vampire Weekend
  • Bent: Penny & Ashtray